When TransLoc’s mobile engineering team set out to build the Microtransit apps for iOS and Android, our top priority was to build them in such a way that we could iterate at a sustainable pace for years to come. As much as possible, we wanted to avoid rewriting part or all of the apps for purely technical reasons, putting customer needs on hold.
To accomplish this, we knew that we would first need to refactor continuously as the apps grew, which meant we needed to be able to write automated tests to provide a safety net. Second, we also needed to find a way to split the apps into modular elements so that no one part would ever grow too complicated and slow us down. Lastly, we wanted each element to be composable so that they would be easy to arrange in different configurations over time.
One area where we’ve worked especially hard to achieve these goals is in how we use UIViewController on iOS. (We’ve taken similar care with Activity on Android, but this post focuses on iOS.)
There were a number of common approaches that we needed to rethink because each one of them prevented us from achieving our goals:
- Performing navigation in a view controller.
- Initializing view controllers with resource instances
- Making view controllers responsible for loading data, formatting data for display, configuring the view, handling user input, and more.
- Giving view controllers direct dependencies on other classes.
Approaches 1 and 2 make view controllers difficult to compose. Approaches 3 and 4 limit their modularity and testability. Here’s what we do instead:
Manage navigation with a router
Instead of performing navigation in view controllers, we make them delegate the handling of actions that may result in navigation. This improves composability and helps with testability too.
Inspired by the VIPER architecture and the coordinator pattern, we keep navigation out of our view controllers. At a high level, we think of each view controller as a sort of “function” in that it takes some inputs (e.g. data from our API and input from the user) and produces an output (e.g. an intent to navigate). Having clearly-defined outputs makes testing easier and allows reusing the same view controller in different situations.
We call the component responsible for navigation a router. It serves as the view controller’s delegate so that it can receive the screen’s output and navigate accordingly. Here’s an abbreviated example:
protocol ListViewControllerDelegate: class {
    func listViewController(_ viewController: ListViewController,
                            didSelect item: ListItem)
}

class ListViewController: UIViewController {
    weak var delegate: ListViewControllerDelegate?
    var items: [ListItem]

    func tableView(_ tableView: UITableView, didSelectRowAt indexPath: IndexPath) {
        let item = items[indexPath.row]
        delegate?.listViewController(self, didSelect: item)
    }
}

class Router: ListViewControllerDelegate {
    let navigationController: UINavigationController
    let dependencyProvider: RouterDependencyProvider

    func listViewController(_ viewController: ListViewController,
                            didSelect item: ListItem) {
        let detailViewController = dependencyProvider.makeDetailViewController(with: item)
        navigationController.pushViewController(detailViewController, animated: true)
    }
}
ListViewController’s output is a ListItem. The router uses this to create a detail view controller and pushes it onto the navigation stack. Now, we can more easily test the view controller without needing to worry about the context in which it is presented. Additionally, it can be reused by different routers, each of which may need to navigate in different ways.
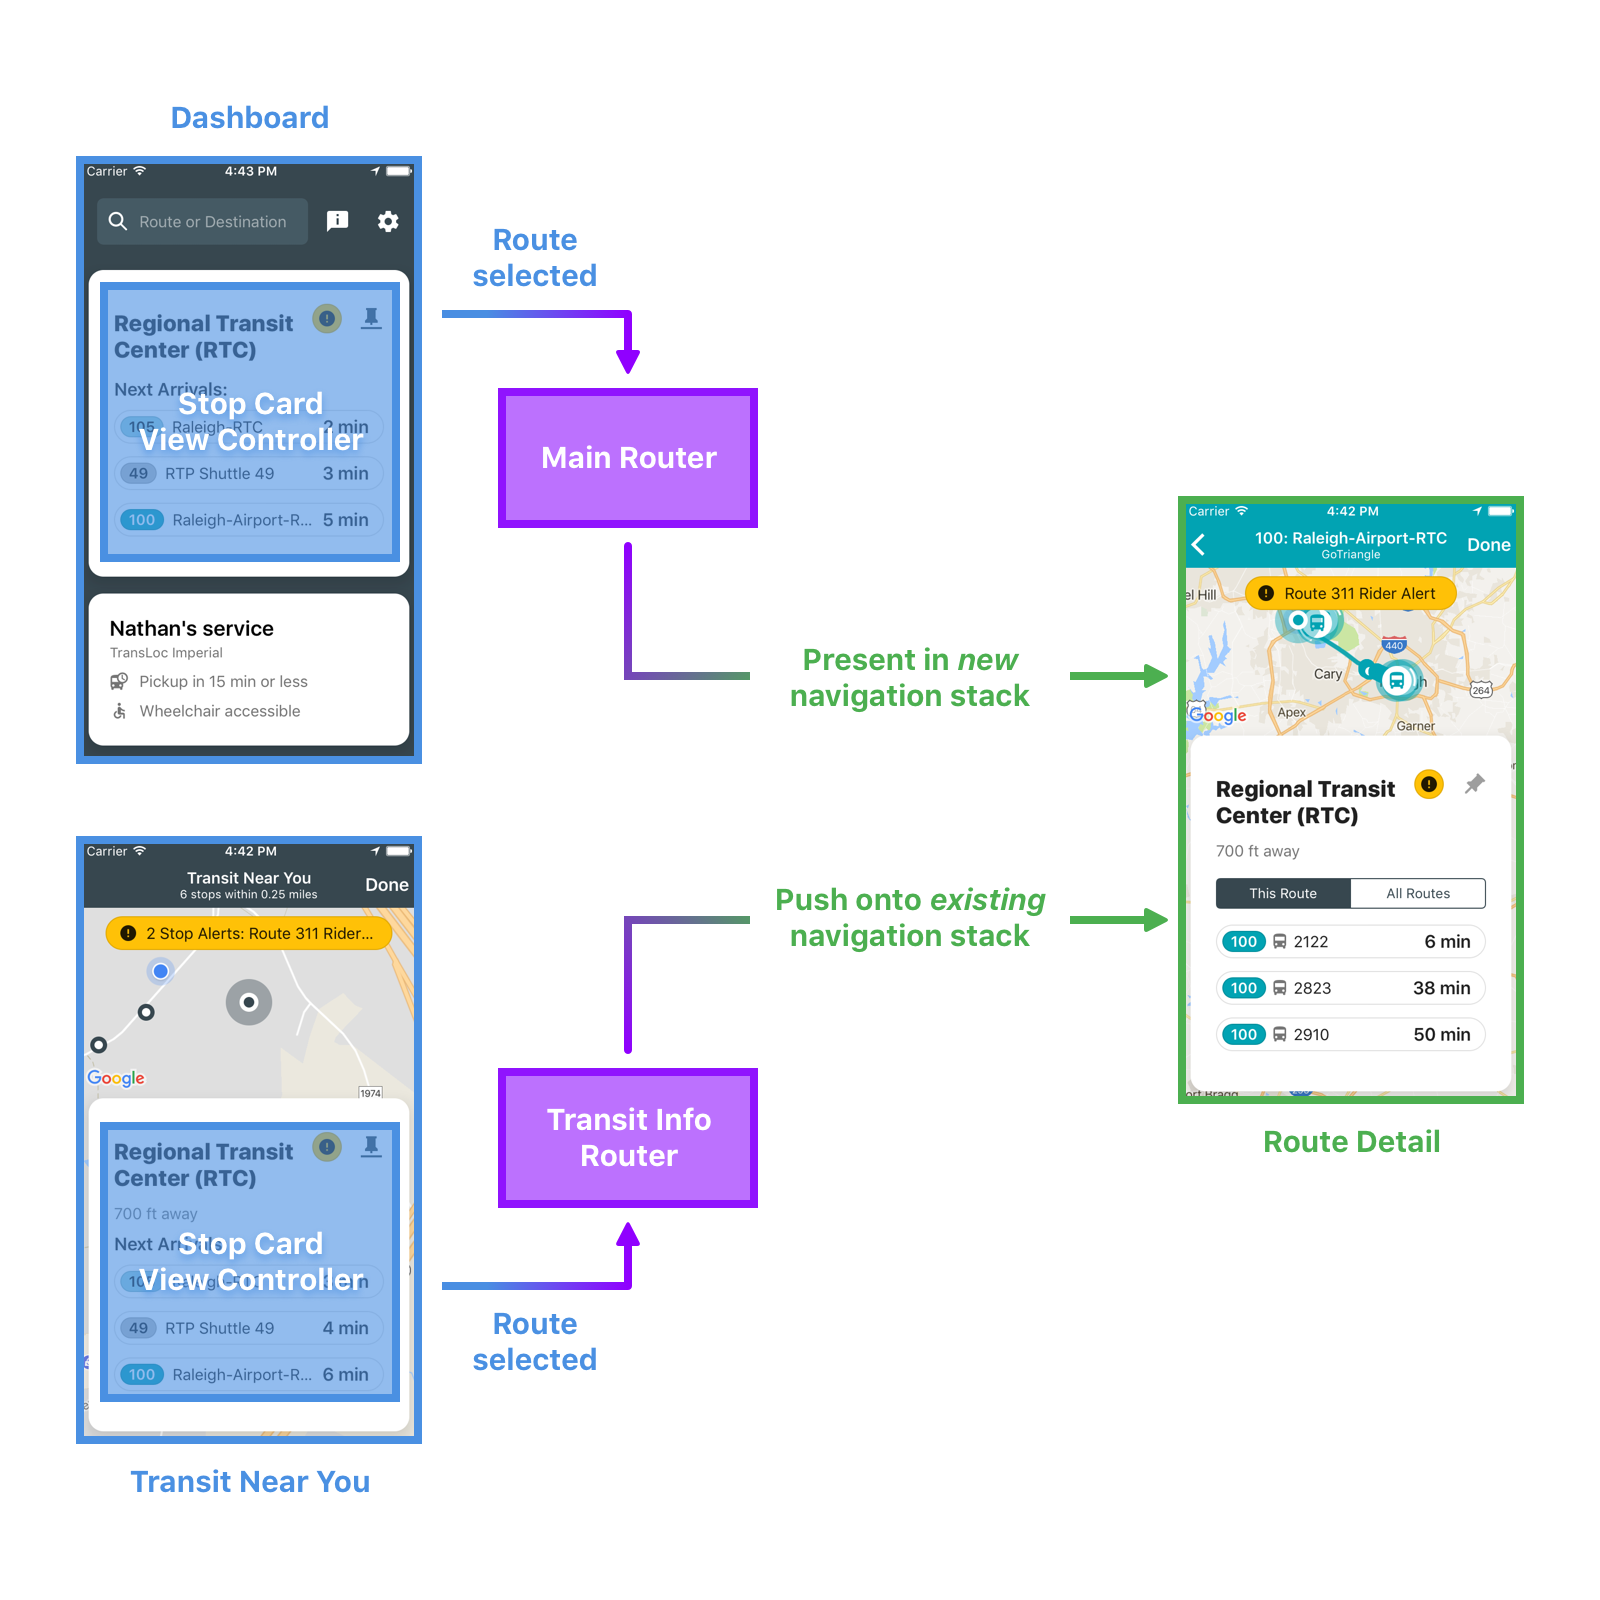
One example where we benefit from this approach in Microtransit is the stop card, which appears on three different screens: the dashboard, the transit near you screen, and the route detail screen. It has a list of routes that serve the stop and when you tap on a route, it navigates to its detail screen. How that navigation happens is different when it’s on the dashboard (a present transition into a new navigation context) vs when it’s on either of the other two screens (a push transition into an existing navigation context).

Incidentally, these delegate methods on the router can also be tested in isolation from each view controller because we can provide a mock RouterDependencyProvider that just returns a plain UIViewController instance instead of an actual detail view controller.
Parameterize screens with IDs
When navigating to a new screen, one common approach is to pass the data to display from the previous screen. This approach, while simple, is limiting because it creates an implicit dependency between the two screens. For example, in the ListViewController example above, the ListItem is used as input to the detail screen. This means that any time we want to show the detail screen for a list item, we must already have all of its data. While this may not be a big deal when navigating within the app, it does make it difficult to expand into supporting things like deep links or Android Instant Apps.
Here’s what we do instead:
func listViewController(_ viewController: ListViewController,
                        didSelectItemWith itemId: ListItemId) {
    let detailViewController = dependencyProvider.makeDetailViewController(with: itemId)
    navigationController.pushViewController(detailViewController, animated: true)
}
Now the detail view controller is responsible for loading its own data. Depending on the scenario, it may need to load the resource from local storage, a web API, or a system service like Core Location.
Given a string representation of the ID, we can also write a URL to describe the resource, and navigating in response to opening a parsed URL is no different than navigating from any other screen.
In Microtransit, we deal with live data and have to think through possibilities like linking to a transit route that has been deleted from the system. While the approach of passing along stale data (rather than the route ID) may seem more appealing than allowing a broken link, the broken link is actually no more jarring than the underlying reality that the transit route itself no longer exists. In this situation, the better solution would be to find a way to communicate the reason the transit route is no longer available rather than to present stale data.
Organize each screen using Model-View-Presenter
I hinted at this earlier when I mentioned VIPER, but instead of making the view controller responsible for loading data, formatting data for display, configuring the view, handling user input, and more, we divide these tasks into a collection of components that each has a clearly-defined responsibility. We’ve found that this approach makes everything easier to test.
We talk about our screen-level architecture in terms of Model-View-Presenter (MVP). This approach came to us from the Android members of our team, and it is approximately a subset of the ideas from VIPER. Whatever terminology you prefer, here’s how we break up the roles:
- Model: Manages the state (a la Redux), loads data, and formats it for display.
- View: Provides an interface that receives formatted data for display and sends out UI events. This is the view controller itself along with its view hierarchy. It should contain as little business logic as possible. In situations where the view is difficult to test, this helps to minimize risk.
- Presenter: Mediates between the model and view. Sends output up to the router.
We also usually introduce a Transformer, which is just a class that has a bunch of pure functions from the state to various formatted output types for the view.
Another benefit we’ve gained by adopting this architecture across iOS and Android is that it’s provided a shared language for our engineers to discuss solutions and cross-pollinate ideas between platforms.
Use dependency injection
Instead of giving view controllers direct dependencies on other classes, we make them depend on protocols and inject instances of classes that fulfill those requirements. If you’re unfamiliar with dependency injection (DI), I recommend watching the first 15 minutes of the Guice talk from Google I/O 2009 which does a good job of illustrating some of the core ideas.
The primary benefit that we gain by using DI is that it allows us to substitute mock implementations when we run our tests so that we can test each class independently of its dependencies. This also allows us to get accurate code coverage metrics.
For our presenters and models, we use constructor injection, but for our view controllers, we use property injection to avoid overriding UIKit’s default constructors. This allows us to instantiate our view controllers from storyboards.
Speaking of storyboards, we create a separate storyboard for each view controller, and we don’t use segues, which do not work very well with our router-based approach to navigation.
All of the actual code to create and inject the components for each screen lives inside of the screen-specific factory method on the dependency provider (see the code listing under section 1). This makes it easy to manage how many instances of each dependency are getting created throughout the entire app. This is beneficial because it makes it easy for us to see the structure of the app at a high level when needed.
So far, we’ve found these design choices to be a big help. We can write unit tests, reuse components, and keep everything organized and simple enough to maintain. More importantly, they’re helping us achieve our goal: build the Microtransit apps in a way that will allow us to iterate at a sustainable pace for years to come.
I’ll be presenting this topic at Triangle CocoaHeads on Thursday, September, 28 in RTP. Join us, and let’s continue the conversation.